Provided you have a video channel created, you can start broadcasting on it by selecting one of the available broadcasters from the list.
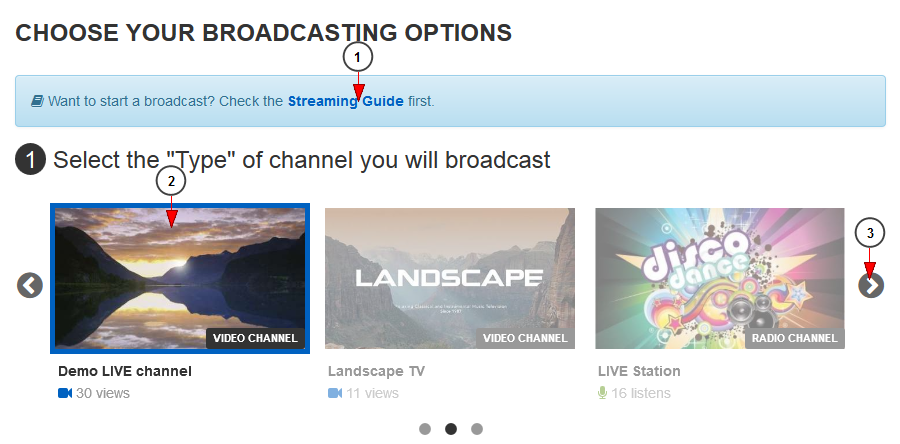
We recommend you to read the Streaming Guide page before starting a broadcast session as you may find useful tips that will enhance your broadcast experience.
1. Click here to read the Streaming Guide page.
2. Click on the channel thumb in order to select the channel you want to broadcast on.
3. Click on the arrow to view the rest of your channels.
After you have selected the channel you should adjust the recording settings:
1. Click here to turn the auto-recording settings On or OFF for the channel.
2. Click here to open the Advanced Recording settings window.
3. Click here to view the public channel page.
4. Click here to go to Edit the channel details page.
5. Click here to view the statistics for the channel.
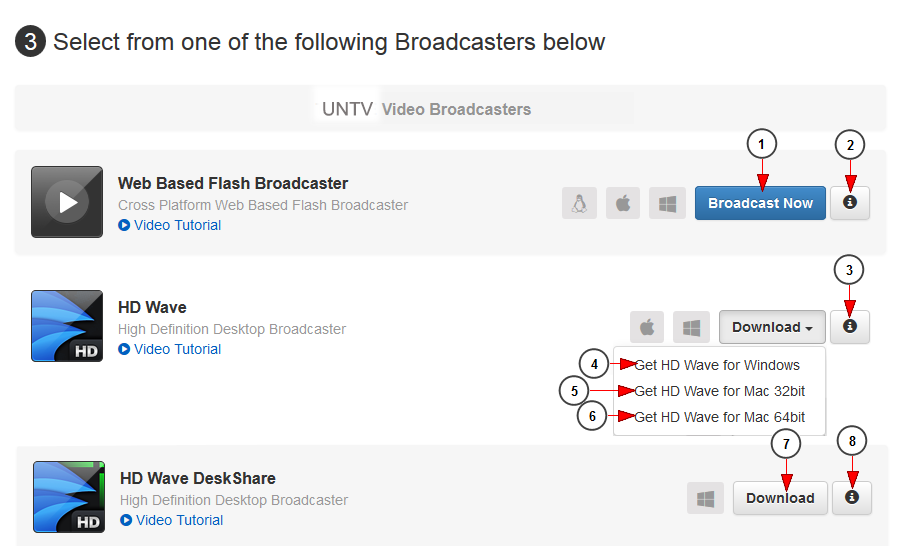
After you have selected the channel and adjusted the recording options you can choose one of the UniverseNetwork broadcast applications:

1. Click here to start broadcasting using Web Based Flash Broadcaster.
2. Click here to view the hardware specifications for the Web Based Flash Broadcaster.
3. Click here to view the hardware specifications for the HD Wave broadcaster.
4. Click here to download HD Wave broadcaster for Windows OS.
5. Click here to download HD Wave broadcaster for MAC OS 32 bits.
6. Click here to download HD Wave broadcaster for MAC OS 64 bits.
7. Click here to download HD Wave DeskShare broadcaster.
8. Click here to view the hardware specifications for the HD Wave DeskShare broadcaster.
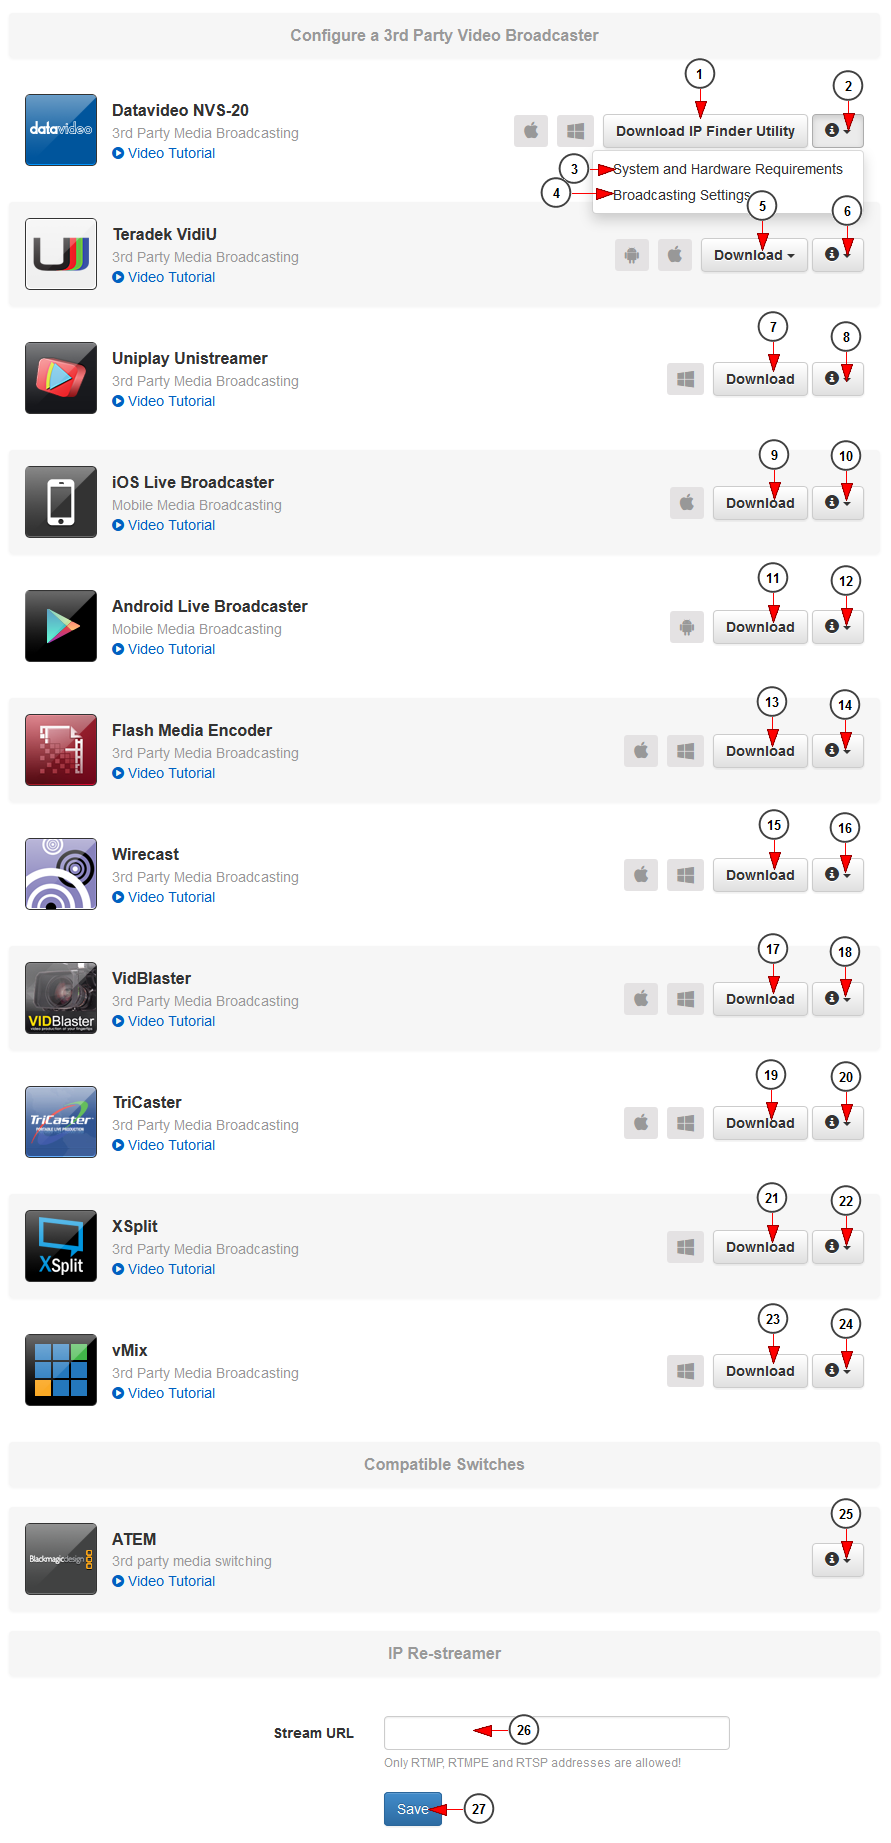
UniverseNetwork offers you the possibility to broadcast on your channel using multiple 3rd party broadcast applications.
1. Click here to download the IP Finder Utility for Datavideo NVS broadcaster.
2. Click on the arrow to open the drop-down menu to view the available options.
3. Click here to view the system and hardware requirements for Datavideo NVS-20.
4. Click here to view the hardware specifications and broadcast options for the Datavideo NVS-20 broadcaster.
5. Click here to download the Teradek VidiU application for android devices from Google paly store or for iOS devices from Apple store.
6. Click here to view the hardware specifications and broadcast options for the Teradek VidiU broadcaster.
7. Click here to download the Uniplay Unistreamer broadcast application.
8. Click here to view the hardware specifications and broadcast options for the Uniplay Unistreamer broadcaster.
9. Click here to download iOS Live Broadcaster if you want to stream from iOS mobile devices.
10. Click here to view the hardware specifications and broadcast options for the iOS Live Broadcaster.
11. Click here to download Android Live Broadcaster if you want to stream from android mobile devices.
12. Click here to view the hardware specifications and broadcast options for the Android Live Broadcaster.
13. Click here to download Flash Media Encoder broadcaster. Once the broadcaster application downloaded you need to install it in your computer.
14. Click here to view the hardware specifications and broadcast options for the Flash Media Encoder.
15. Click here to download Wirecast broadcaster. Once the broadcaster application downloaded you need to install it in your computer.
16. Click here to view the hardware specifications and broadcast options for the Wirecast.
17. Click here to download VidBlaster broadcaster.
18. Click here to view the hardware specifications and broadcast options for the VidBlaster.
19. Click here to download TriCaster broadcaster.
20. Click here to view the hardware specifications and broadcast options for the TriCaster.
21. Click here to download XSplit broadcaster. Once the application downloaded, you need to install it in your computer.
22. Click here to view the hardware specifications and broadcast options for the XSplit.
23. Click here to download vMix broadcaster. Once the application downloaded, you need to install it in your computer.
24. Click here to view the hardware specifications and broadcast options for the vMix.
25. Click here to view more details related to Atem capture cards and how you can configure them for broadcast using HD Wave.
Note: 3rd party broadcasters may work, but they are not supported. All time to troubleshoot live streams from a 3rd party broadcaster is considered exploratory. We highly recommend you utilize our supported broadcasters, the HD Wave, SD Wave or the Web Based Flash broadcaster.
More details regarding 3rd party broadcasters can be found in the About 3rd party broadcasters manual page.
26. Insert here the external RTMP stream.
Note: users can insert RTMP or RTMPE of external stream addresses and the content will play on their Streaming platform channel.
27. Click here to save the settings.
Broadcast settings for 3rd Party broadcasters
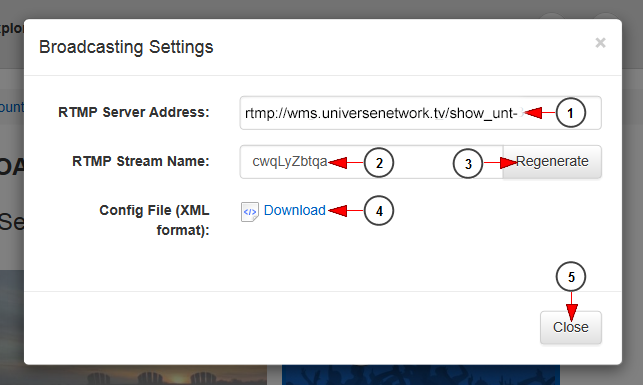
When you click on Broadcaster settings link, an overlay button will be displayed and you can see and copy the RTMP details:

1. Here you can see the RTMP server address, that you need to copy and insert in the selected 3rd party broadcaster.
2. Here you can see the RTMP server name, that you need to copy and insert in the selected 3rd party broadcaster.
3. Click here to generate a new RTMP stream name.
4. Click here to download the configuration file in your computer.
5. Click here to close the broadcast options page.


